


When it comes to printing, bleed is your best friend. It’s of vital importance when making sure your print file comes out looking exactly how you want it to on paper. But many people don’t know how to use bleed, or why it’s so important. In fact, as a print company, missing bleed is by far the most common issue we face. So what is bleed? Here to help you create the perfect print products. Chilliprinting tells you all you need to know about bleed in printing.

What is Bleed?
Bleed is the dead space around the edge of your design. That allows your artwork to run to the edge of the page. In other words, it’s the part of your design that will be trimmed off when it comes to print.

Bleed is crucial, as no guillotine or cutting machine can trim exactly along the cutting edge. Thus a small amount of leeway is always required. Printers need this buffer zone to account for any movement of paper during trimming.
Different printers will require different levels of bleed for different print products. So it’s always worth consulting with them before adding bleed to your design. For example, at Chilliprinting, our posters need 0.1 inches of bleed on each edge. Be sure to include bleed in your print file, and don’t forget to export it when you save and convert your document to PDF.
Why You Need Bleed
Bleed is so often forgotten about. When designing a custom poster, flyer or brochure for print. It’s easy to focus on achieving the most beautiful design, without leaving room for bleed. But if you want a color, image or any other element of your design to run to the edge of your poster. You need bleed in your print file.
Although cutting machines are precise, they aren’t perfect. These machines cut large stacks of paper at the same time. Thus, while the first poster may be cut to perfection. The poster at the bottom is more likely to have a very small margin of error. This is where bleed comes in. It balances out these imperfections. No bleed or too little bleed in your document could mean your design doesn’t reach the edge of the page. Leaving a tiny and unwanted border of white paper around the edge of your poster. This, of course, looks highly undesirable.
Similarly, it’s important that none of the essential features of your design fall inside the bleed. As they could be lost. If a border, an image or text are too close to the trim line, they might look imbalanced, or worse, they could simply get cut off during the trimming process. In this sense, bleed acts as a buffer zone within which nothing is guaranteed to make it to print.
This sort of buffer area is also called a quiet border. The best way to avoid losing any key design elements during trimming is by making quiet borders an integral part of your design from the start. Always leave enough safe space between your core design and the cutting edge. For posters, Chilliprinting recommends a safety margin for elements such as graphics, text and important information of at least 0.08 inch.
How to Apply Bleed
You can create the bleed area from the moment you create your design. This is the best way to make sure it’s the right size, and that your core design elements are kept well away from the bleed area.
The easiest way to add bleed is using InDesign. When creating a new document, go to Preset Details, and choose your preferred measurement units. Go to Page Size, and enter the proportions you want your print document to be. Then go to Bleed and Slug, and enter the bleed margin you want – for example, 0.1 inch. This will automatically add a bleed area to your print file.
With Adobe Photoshop, Microsoft Word, or PowerPoint, you, unfortunately, do not have the ability to add bleed when creating a PDF. That means you’ll need to do it manually. But this is easy too – if you want a bleed of 0.1 inch, simply make your image size 0.2 inch bigger at the start (0.1 inch all round). You can then treat the extra 0.2 inch as your bleed area, which will be removed when we trim your file during printing. For example, for a standard poster size of 32 inches x 48 inches, the bleed area (adding 0.1 inch to each edge) would need to be 32.2 inches x 48.2 inches.
A great way of managing bleed – and communicating to your printers exactly how you want your file to be printed – is by using PDF boxes.
How To Use PDF Boxes
PDF boxes are helpful markers that can be included in your print file to map out the different areas, showing where the design should be cut out, and which part of your design constitutes bleed. These enable you to mark out the cutting line (Trim Box), and the bleed area beyond it (Bleed Box), making it clear, both for yourself and for your printers, how your design should look on paper. When working with PDF boxes, there are four boxes you need to know about.

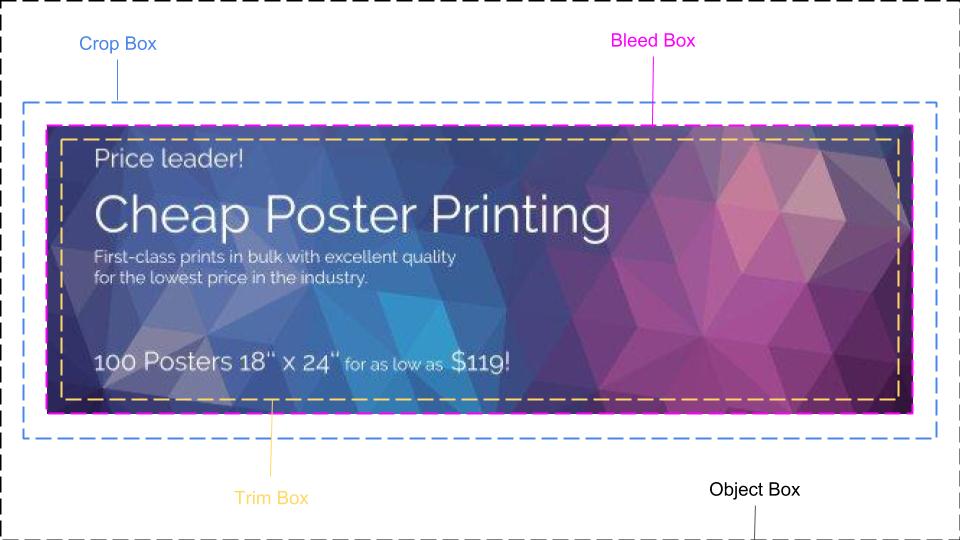
1. Object Box
This box usually shows the overall size of a PDF file, for example: 24” x 36” Poster, letter format Flyer, 3.5 x 2 inch Business Card, and so on. For general use, the Object Box is used to specify the width and height of the page, i.e. the actual page size. However, for prepress use, it is important to create a slightly oversized Object Box, so that printers can see the bleed, the crop marks, and any useful information (such as the file name, or the date and time when the file was created). This means that PDF files used in graphic design usually have an Object Box which is larger than the trimmed page size. This is where the Trim Box comes in…
2. Trim Box
This box represents the actual size of the final, trimmed product – i.e. the edge of the page. The Trim Box is essential for page positioning because it defines the actual page size that you want to be printed. Between the Trim Box and the Object Box, you’ll need a Bleed Box…
3. Bleed Box
The Bleed Box should be just a little larger than your Trim Box, accounting for the bleed. For example, if you want a bleed of 0.1 inch, your Bleed Box should be 0.2 inch larger than the Trim Box (0.1 inch on either edge). This will mean that any objects that are intended to bleed during the print process will extend past the page edge by 0.1 inch. Again, remember not to include any vital design elements in the Bleed Box.
4. Crop Box
For prepress use, the Crop Box is effectively unnecessary, as it simply defines the visible area of a PDF file. When it comes to adding bleed, you don’t need to worry about the Crop Box.
The concept of applying bleed using PDF boxes is simple – you just need to extend the Object Box out past the edge of your page. Then, when creating the PDF, you simply set your bleed margins to the length you want.
Conclusion
Bleed is a crucial element of any design when it comes to print. We can’t tell you how many designs come through to us without bleed, making it impossible for us to guarantee the image will reach the edge of the page when printing in bulk. No one wants their design failing to reach the end of the paper, or perhaps worse, falling off it. Luckily, it’s so easy to avoid this by incorporating bleed into your design as you go. Using PDF boxes, you can create a clear, customizable, and comprehensive PDF print file, which is sure to come out exactly how you want it to in print. Simply follow our advice, and you’ll have mastered bleed in no time. Then you’ll be well on your way to creating the perfect print products.
Now that you’ve master print bleed, head to our Online Printing Store. And print your designs at the best quality and price with Chilliprinting. We print it all, from the traditional posters, flyers and brochures to stickers, calendars, hang tags.